How to Crochet a Spooktacular Halloween Bag

As the leaves turn crispy and the nights grow a little chillier, we all know what that means, Halloween is just around the corner! 

Whether you’re planning to scare up some fun with the kiddos, stock up on candy (I see you, sneaky snacker), or just want a festive project to sink your hooks into, I’ve got the perfect crochet treat for you. No tricks, I promise!

Today, we’re whipping up a spooktacular Halloween bag that’s as functional as it is frightfully fun.

This project is perfect for beginners eager to learn some new stitches and seasoned crocheters looking for a quick and satisfying project. 

Ready to get started? Grab your yarn, and let’s make some magic!

How to Crochet a Halloween Bag​

What You’ll Need

Before we dive into the stitches and patterns, let’s talk supplies. Here’s what you’ll need to create your very own Halloween bag:

  • Yarn: I recommend using a medium-weight yarn (Category 4) in two colors. Orange for the pumpkiny vibes and black for the spooky accents. If you’re feeling extra creative, throw in some green for a leafy touch!
  • Crochet Hook: A 5mm (H/8) crochet hook works perfectly with this yarn weight.
  • Scissors: For cutting your yarn.
  • Tapestry Needle: For weaving in those pesky ends.
  • Stitch Marker: Optional, but helpful for keeping track of rounds.

Got everything? Awesome! Let’s get hooking!

Halloween Bag​ Crochet Patter - Step By Step Guide

How to Crochet a Halloween Bag​

Step 1: The Base of the Bag

We’re going to start with the base of the bag. 

This will be a flat circle that will later become the bottom of your Halloween bag.

Magic Circle: Begin with a magic circle (or a chain 4, slip stitch to form a ring).

Round 1: Chain 2 (this does not count as a stitch), make 12 double crochets (dc) into the ring. Join with a slip stitch to the first dc. (12 sts)

Round 2: Chain 2, 2 dc in each stitch around. Join with a slip stitch. (24 sts)

Round 3: Chain 2, dc in the next stitch, 2 dc in the next stitch. Join with a slip stitch. (36 sts)

Round 4: Chain 2, dc in the next 2 stitches, 2 dc in the next stitch. Join with a slip stitch. (48 sts)

Round 5: Chain 2, dc in the next 3 stitches, 2 dc in the next stitch. Join with a slip stitch. (60 sts)

Keep going until your base is the size you want for your bag. 

I usually stop at around 72 stitches, but you can make it larger or smaller depending on your needs.

Step 2: Building the Body

Now that the base is complete, let’s work on the body of the bag. 

This is where you can get creative with your colors and patterns!

Round 1: Chain 2, dc in each stitch around. Join with a slip stitch. (72 sts, or your final base stitch count)

Round 2-12 (or desired height): Continue with dc in each stitch around, joining with a slip stitch at the end of each round.

Here’s where you can switch colors for some spooky stripes! Alternate between your main color and the accent color every few rows. 

I like to do two rounds of orange followed by two rounds of black to keep that Halloween spirit alive.

Step 3: Creating the Handles

No bag is complete without some sturdy handles! Here’s a simple way to add them:

Handle Round 1: After you’ve reached your desired bag height, chain 2, dc in the next 10 stitches, chain 20 (this will be the handle), skip 20 stitches, dc in the next 20 stitches, chain 20, skip 20 stitches, dc in the last 10 stitches. Join with a slip stitch.

Handle Round 2: Chain 2, dc in each dc and each chain stitch around. Join with a slip stitch.

And voilà! You’ve got yourself some handles.

Step 4: Adding the Spooky Face (Optional)

What’s a Halloween bag without a spooky face? 

This part is optional but adds a fun twist to your project.

For the Eyes:

Magic Circle: Start with a magic circle in black yarn.

Round 1: Chain 2, make 8 dc into the circle. Pull tight and join with a slip stitch.

Round 2: Chain 2, 2 dc in each stitch around. Join with a slip stitch.

Make two of these and sew them onto your bag.

For the Mouth:

Chain 15: Fasten off and shape into a smile. Sew onto the bag.

You can also add a nose, fangs, or whatever spooky elements you desire! 

This is your chance to get creative and make your Halloween bag one of a kind.

Step 5: Finishing Touches

Before you declare your Halloween bag complete, take a moment to weave in any loose ends with your tapestry needle. 

Give the bag a good stretch to ensure everything is in place.
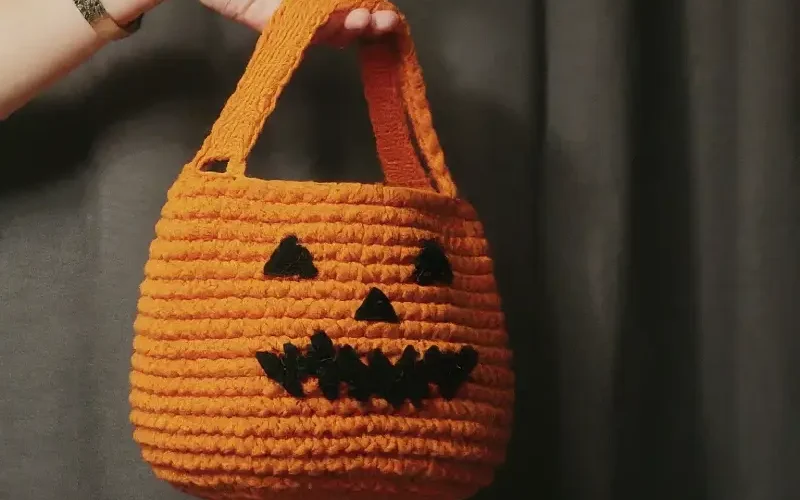
Voila!

And there you have it, a Halloween bag that’s not just a treat to make but also a treat to use! 

Whether you’re collecting candy, using it as a festive decoration, or gifting it to someone special, this bag is sure to add a little extra magic to your Halloween season.

Feel free to customize this pattern to fit your style. 

Add more colors, different stitch patterns, or even some creepy crochet appliqués.

The possibilities are endless, and that’s what makes crochet so fun!

So, what are you waiting for? Grab your yarn, pick up your hook, and let’s make this Halloween one to remember with your very own crochet bag! 

Happy hooking

Be sure to share your beautiful work on Crochet Patternz Community. I’d love to see how you personalize your project!