How to Crochet a Boat-Themed Baby Blanket: A Step-by-Step Guide
Crocheting a baby blanket is a heartwarming way to welcome a little one into the world, and adding a boat theme makes it even more special, perfect for a baby with a nautical nursery or parents who love the sea.
Whether you’re new to crochet or a seasoned pro, this boat baby blanket pattern will be a relaxing and fun project.
The blanket is simple enough for beginners but includes a few creative touches that make it stand out.
So, grab your yarn, cozy up in your crafting space, and let’s set sail on this crochet adventure!

Materials You’ll Need:
- Yarn: Choose soft, baby-friendly yarn in colors that reflect a boat or nautical theme. Think ocean blues, seafoam greens, sandy beiges, and classic white. You’ll need worsted weight yarn, approximately 800-1000 yards for a blanket about 30″ x 35″.
- Hook: Size H-8 (5.0 mm) crochet hook
- Scissors
- Tapestry Needle (for weaving in ends)
- Stitch Markers (optional but handy for marking corners and sections)
Stitches You Need to Know:
- Chain (ch)
- Single Crochet (sc)
- Half Double Crochet (hdc)
- Double Crochet (dc)
- Slip Stitch (sl st)
This pattern will alternate simple stitch patterns with creative details to form a soothing texture, making it perfect for snuggling a baby.
And don’t worry, if you’re just starting out, these stitches are easy to pick up!
Blanket Size:
The blanket we’ll be making is approximately 30” x 35”, a standard baby blanket size.
This size is ideal for swaddling, as a stroller blanket, or just for tummy time on the floor.
Choosing Your Colors and Planning the Stripes
For the boat theme, alternating stripes in ocean blues and whites will bring the seaside to life.
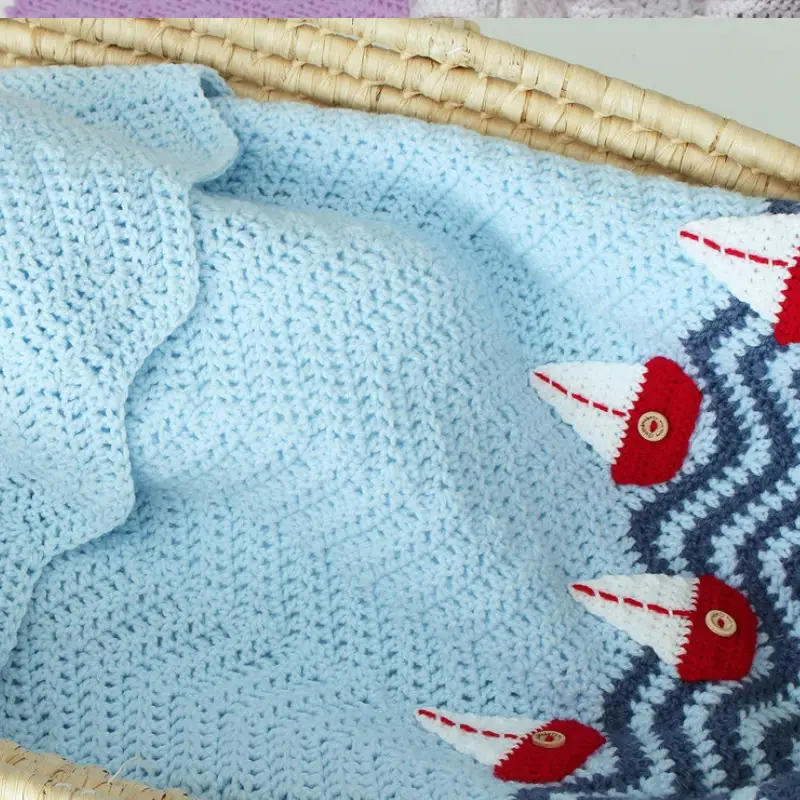
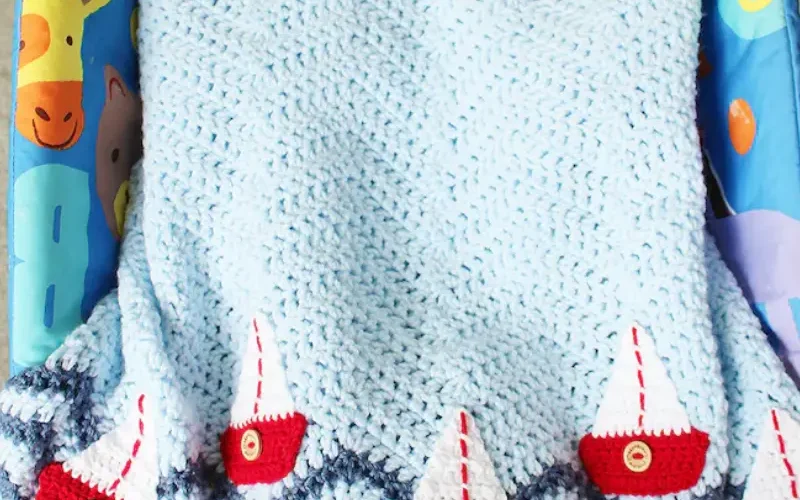
You can also add a wave-inspired border for extra flair and incorporate little appliqués like boats, anchors, or stars.
If you’re ready to get started, pick out three to four colors for your blanket, let’s say navy blue for the main body, white for the stripes, and a soft turquoise or sea green for accents.
Boat Baby Blanket Crochet Pattern Guide

Let’s Begin Crocheting!
Step 1: Starting the Foundation Chain
We’ll start with a simple foundation chain.
This chain sets the width of your blanket, and you can adjust it depending on the size you’d like.
Chain 90 (or adjust for your desired width). This will be the foundation of your blanket.
If you want a wider or narrower blanket, make sure your foundation chain is a multiple of 10 for easy stitch pattern transitions later on.
Step 2: Row 1 – Single Crochet Foundation
For the first row, we’ll create a sturdy base with single crochet stitches.
Row 1: Starting in the second chain from the hook, work single crochet (sc) in each chain across the row.
You should have 89 stitches at the end. Chain 1 and turn.
This base row helps your blanket lay flat and gives you a solid foundation to build on.
Step 3: Rows 2-5 – Creating the Wave Stitch Pattern
We’re going to create a soft, undulating wave pattern that will mimic the gentle movement of the ocean. The pattern alternates between half double crochet and double crochet stitches to give it texture.
Row 2: Chain 2, skip the first stitch, and half double crochet (hdc) in the next stitch.
Then, double crochet (dc) in the next two stitches, half double crochet in the next two stitches.
This creates a gentle wave texture. Chain 2 and turn.
Rows 3-5: Repeat Row 2 for a total of 4 rows of wave stitch.
The texture should start to feel soft and rippled, perfect for the ocean theme.
Step 4: Stripe Pattern (Optional)
At this point, you can change colors to start creating stripes.
The classic nautical look is to alternate blue and white, but feel free to get creative with your color choices.
Row 6: Change yarn color.
Work one row of single crochet (sc) across in your new color, then chain 1 and turn.
Row 7: Work another row of single crochet in the same color. This will create a nice, clean stripe.
Row 8: Switch back to your original color and repeat Rows 2-5 to continue the wave pattern.
You can repeat this stripe sequence every 5 rows or so, creating an alternating stripe pattern.
The waves in your main color will resemble the ocean, while the stripes will evoke the crisp sails of a boat.
Step 5: Continue Crocheting the Main Blanket Body
Repeat the wave pattern and stripe pattern until your blanket reaches about 30 inches in height.
The body of the blanket will grow quickly, and you’ll be able to enjoy watching the nautical theme unfold as you crochet.
Step 6: Adding a Boat or Nautical Appliqué
No boat-themed baby blanket is complete without a little nautical touch!
Once the main blanket is finished, you can add crocheted appliqués like a tiny boat, anchor, or even stars to give the blanket some personality.
Here’s a simple way to crochet a small boat appliqué:
Boat Base
With brown or beige yarn, chain 10.
Single crochet into the second chain from the hook and each chain across. Chain 1 and turn.
Work 2 more rows of single crochet. Fasten off.
Sail
With white yarn, chain 7.
Single crochet into the second chain from the hook and each chain across. Chain 1 and turn.
Work 1 decrease at the beginning and end of each row (sc2tog) until you have only one stitch left. Fasten off.
Sew the sail onto the boat base and then sew the whole boat onto the blanket using a tapestry needle.
You can place one or two boats at the top or bottom corners for that extra touch of whimsy.
Step 7: Adding a Border
To finish off your baby blanket and make it look polished, we’ll add a border.
A wavy, sea-inspired border will enhance the boat theme.
Round 1 (Border): Starting in any corner, attach your yarn and work single crochets evenly around the entire edge of the blanket, placing 3 sc in each corner to help it lay flat.
Join with a slip stitch to the first sc.
Round 2 (Optional Wavy Border)
Chain 3, skip one stitch, and double crochet (dc) in the next stitch, chain 1, skip a stitch, and repeat around the blanket.
This will give a slight ripple effect, mimicking ocean waves.
Step 8: Weave in Your Ends
Once you’ve finished your border, take your tapestry needle and weave in all the loose ends from color changes and appliqué attachments.
This will ensure a neat and professional finish.
Customizing Your Blanket

There are so many ways to customize your boat themed baby blanket:
Use variegated yarn in ocean colors for a gradient effect.
Add more boat or anchor appliqués for a fuller nautical vibe.
Try a shell stitch for the border for even more texture and interest.
Voila
And there you have it, your very own boat baby blanket, perfect for a baby shower gift or a special little one in your life.
This project is both meditative and rewarding, combining easy to learn stitches with creative elements like stripes, waves, and appliqués. Whether you’re making it for your baby or as a gift, this blanket will surely be cherished for years to come.
Happy crocheting, and feel free to share photos of your completed boat baby blankets!
Let’s keep the crochet community inspired, one blanket at a time.


