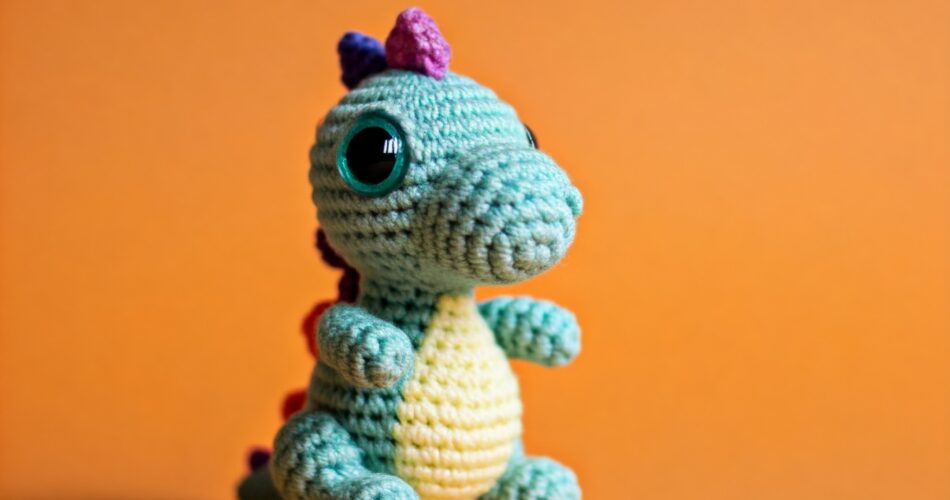
If you’re looking for a fun, quirky crochet project that’ll bring smiles to kids and adults alike, a colorful mini dinosaur is just the thing!
With its cute little spikes, stubby legs, and playful charm, this crochet dino makes for a perfect toy, desk buddy, or gift.
Whether you’re an experienced crocheter or someone who’s just dipping their toes into the world of amigurumi, this project is both beginner friendly and customizable with fun, vibrant colors.
In this blog post, I’ll walk you through how to crochet a mini dino, perfect for brightening up anyone’s day.
You can choose your favorite shades to give your dino a unique personality, whether it’s a classic green dino or a rainbow-colored cutie!
Materials You’ll Need:
- Yarn: Medium-weight (size 4) yarn in a variety of colors. You’ll need one main color for the dino’s body, a contrasting color for the spikes, and optional colors for details like the belly or feet.
- Crochet Hook: A 3.5 mm (E-4) crochet hook, which is perfect for tight stitches needed in amigurumi.
- Polyester Stuffing: For filling your mini dino to make it plush.
- Tapestry Needle: For sewing the parts together and weaving in ends.
- Stitch Marker (optional): To keep track of your rounds.
- Safety Eyes (optional): If you want to give your dino cute, toy-like eyes. Embroidery thread or yarn for sewing on eyes works too.
Abbreviations (U.S. terms):
- ch = chain
- sc = single crochet
- inc = increase (work 2 sc in the same stitch)
- dec = decrease (single crochet two stitches together)
- sl st = slip stitch
- st(s) = stitch(es)
A Step by Step Guide for Beginners

Step 1: Crocheting the Dino Body
We’ll start by creating the body of your colorful mini dino.
The body will be worked in continuous rounds, so be sure to use a stitch marker if you need help keeping track of your rows.
Round 1: The Start of the Body
Magic ring, 6 sc into the ring. (6 sts)
Round 2: Inc in each st around. (12 sts)
Round 3: Sc in the next st, inc in the next. Repeat around. (18 sts)
Round 4: Sc in the next 2 sts, inc in the next. Repeat around. (24 sts)
Round 5: Sc in the next 3 sts, inc in the next. Repeat around. (30 sts)
At this point, your dino’s body should start forming a rounded shape.
You can adjust the number of stitches and rounds depending on how big you want your mini dino to be.
Rounds 6-12: Shaping the Body
For the next several rounds, simply sc in each stitch around to build the height of the body. (30 sts each round)
Feel free to add stripes or color changes here for a more colorful dino!
Round 13: Start Decreasing
Sc in the next 3 sts, dec in the next. Repeat around. (24 sts)
Round 14: Sc in the next 2 sts, dec in the next. Repeat around. (18 sts)
Round 15: Sc in the next st, dec in the next. Repeat around. (12 sts)
Before closing up the body, stuff your dino with polyester stuffing.
Make sure to add enough stuffing so the dino is plush but not overly firm.
Round 16: Finish the Body
Dec in each stitch around. (6 sts)
Fasten off, leaving a long tail.
Use the tail and tapestry needle to weave through the remaining stitches and pull tight to close the opening.
Now you’ve got a cute, round dino body!
Time to add the rest of the features that make this mini dino pop.
Step 2: Crocheting the Dino Head
Next up is the head, which will also be worked in rounds.
Round 1: Starting the Head
Magic ring, 6 sc into the ring. (6 sts)
Round 2: Inc in each st around. (12 sts)
Round 3: Sc in the next st, inc in the next. Repeat around. (18 sts)
Round 4: Sc in the next 2 sts, inc in the next. Repeat around. (24 sts)
Rounds 5-8: Shaping the Head
Sc in each st around for the next 4 rounds. (24 sts each round)
At this point, if you’re using safety eyes, you can insert them between Rounds 5 and 6, spacing them evenly apart.
Rounds 9-10: Decreasing the Head
Round 9: Sc in the next 2 sts, dec in the next. Repeat around. (18 sts)
Round 10: Sc in the next st, dec in the next. Repeat around. (12 sts)
Stuff the head before finishing the next round.
Round 11: Finish the Head
Dec in each stitch around. (6 sts)
Fasten off, leaving a long tail. Use the tail to sew the head onto the body, positioning it at the narrower end of the body.
Now your mini dino has a body and a head!
Step 3: Crocheting the Legs and Arms
Now let’s make the legs and arms for your mini dino. These are worked in small, simple rounds.
Legs (Make 2):
Magic ring, 6 sc into the ring. (6 sts)
Round 2: Sc in the next st, inc in the next. Repeat around. (9 sts)
Rounds 3-5: Sc in each st around. (9 sts)
Fasten off and leave a long tail for sewing. Stuff lightly and sew the legs to the bottom of the body.
Arms (Make 2):
Magic ring, 6 sc into the ring. (6 sts)
Rounds 2-3: Sc in each st around. (6 sts)
Fasten off and leave a long tail for sewing. Attach the arms to the sides of the dino, near the top.
Step 4: Crocheting the Dino Spikes
Now it’s time to add those cute, colorful spikes running down the back of your mini dino. You can choose a bright color for these to give your dino some personality!
Spike Pattern (Make 5-6 depending on your dino’s size):
Ch 3, sc in the second chain from the hook and the next chain. (2 sts)
Ch 2, turn. Sc in each st. (2 sts)
Fasten off, leaving a long tail for sewing.
Attach the spikes evenly spaced down the back of the dino, starting at the top of the head and going down the body.
Step 5: Crocheting the Tail
Finally, let’s add the tail.
Magic ring, 6 sc into the ring. (6 sts)
Round 2: Sc in each st around. (6 sts)
Round 3: Sc in the next st, inc in the next. Repeat around. (9 sts)
Rounds 4-5: Sc in each st around. (9 sts)
Stuff the tail lightly and sew it to the back of the dino.
Step 6: Finishing Touches
Your mini dino is almost done!
Add any finishing touches like embroidered details for the mouth or cheeks.
You can even give your dino tiny spots or stripes by sewing on small pieces of yarn or embroidery thread.
Congratulations! You’ve just completed your colorful mini dino.
Whether you made this adorable creature for yourself or as a gift for someone special, it’s sure to bring joy and smiles.
The beauty of this pattern is its versatility, change up the colors, size, or details to make each dino unique.
Crocheting this mini dino is not only fun but a great way to practice your amigurumi skills.
Plus, it’s a quick project that you can easily whip up in an afternoon or two.
Have fun experimenting with different colors and adding personal touches.
You might even want to crochet a whole dino family in various sizes!
Be sure to share your beautiful work on crochet patternz community. I’d love to see how you personalize your project!
Happy crocheting! 🦕


