How to Crochet a Ghost Amigurumi: A Spooky and Fun DIY Project for All Levels

If you love crochet and are in the mood for something cute and spooky, then you’re in for a treat! 

Crocheting a ghost Amigurumi is one of the most fun, beginner-friendly projects you can tackle.

Whether you’re decorating for Halloween or just want a cute little companion, this ghost will float into your heart in no time!

This guide is perfect for beginners and seasoned crocheters alike, and by the end, you’ll have your very own handmade ghost buddy.

Let’s get spooky and start crocheting!

What You’ll Need

Before we dive into the crochet pattern, let’s make sure you’ve got all your materials ready:

  • Yarn: White yarn is the go-to for a ghost, but you can mix it up with different colors for a fun twist. A worsted-weight yarn works well for this project.
  • Crochet Hook: A 3.5 mm (E-4) hook is ideal, but you can go smaller or larger depending on how tight or loose you want your stitches to be.
  • Stuffing: Polyfill or fiberfill to give your ghost some fluff and shape.
  • Safety Eyes or Black Embroidery Thread: For your ghost’s eyes.
  • Tapestry Needle: To sew on the ghost’s face and close the project.
  • Stitch Marker: Super useful to keep track of your rounds.
  • Scissors: A sharp pair to snip your yarn.

Stitches You’ll Need to Know

Here’s a quick refresher on the basic crochet stitches used in this pattern:

  • Magic Ring (MR): The starting point for Amigurumi worked in the round.
  • Chain (ch): A foundational crochet stitch.
  • Single Crochet (sc): The primary stitch for Amigurumi.
  • Increase (inc): Two single crochets in one stitch to expand your piece.
  • Decrease (dec): Crocheting two stitches together to reduce the number of stitches.
  • Slip Stitch (sl st): To fasten off and close your work.

Abbreviations:

  • MR: Magic Ring
  • ch: Chain
  • sc: Single Crochet
  • inc: Increase
  • dec: Decrease
  • sl st: Slip Stitch

Ghost Amigurumi Crochet Pattern

How to Crochet a Ghost Amigurumi

Step 1: Crocheting the Ghost’s Head and Body

We’re going to start by crocheting the head and body of your ghost in one continuous piece. 

Don’t worry, it’s easier than it sounds!

Ghost Body Pattern:

Round 1: Begin with a Magic Ring and make 6 sc into the ring. (6 stitches)

Round 2: Inc in each stitch around. (12 stitches)

Round 3: 1 sc, inc around. (18 stitches)

Round 4: 2 sc, inc around. (24 stitches)

Round 5-10: sc in each stitch around. (24 stitches)

Round 11: 2 sc, dec around. (18 stitches)

Round 12: 1 sc, dec around. (12 stitches)

At this point, you’ll have a cute little ball forming. This is the main part of your ghost’s head and upper body.

Add the safety eyes or embroider the ghost’s eyes between rounds 5 and 6, spacing them about 5-6 stitches apart.

Round 13: Dec around to reduce the round to 6 stitches. (6 stitches)

Stuff the ghost with polyfill, making sure it’s nice and plump.

Round 14: Inc in each stitch around. (12 stitches)

Round 15: 1 sc, inc around. (18 stitches)

Round 16-19: sc in each stitch around. (18 stitches)

Adjust the Shape of the Body

You can add or subtract rounds in steps 16-19 to make your ghost taller or shorter. Play around with it to give your ghost a unique shape!

Step 2: Creating the Ghost’s Flowing “Tail”

What makes a ghost a ghost is its spooky, floaty tail! For this pattern, we’re keeping things simple by shaping the bottom of the body to give that classic ghostly look.

Ghost Tail Pattern:

Round 20: 2 sc, dec around. (12 stitches)

Round 21: sc in each stitch around. (12 stitches)

Round 22: 1 sc, dec around. (8 stitches)

This creates a slight narrowing at the bottom, giving your ghost a more rounded look. 

If you want your ghost to have a wavy or ruffled “tail,” try the following:

Round 23: 1 sc, 2 sc in the next stitch around. (12 stitches)

Round 24: 2 sc in each stitch around. (24 stitches)

Fasten off and weave in the ends.

Tip: Play with the Tail

If you want your ghost to have a more dramatic flow at the bottom, you can add more increases in Round 24 or use a lighter yarn to create a more wavy effect.

Step 3: Adding Details to Your Ghost

Now that your ghost is crocheted, let’s give it a little personality! You can go the traditional route with just eyes, or you can add more spooky details like a cute mouth, or even some ghostly blush!

Face:

Eyes

If you haven’t added safety eyes yet, now’s the time! Place them between rounds 5 and 6, about 5 stitches apart. If you’re using embroidery, stitch two small circles for eyes.

Mouth

To create a spooky or smiley face, use black embroidery thread or yarn to stitch a small “O” shape for a ghostly moan or a “u” for a smile.

Blush (Optional)

Add two small pink blush spots below the eyes using pink yarn or felt for a kawaii-style ghost.

Step 4: Assembly and Final Touches

Once your ghost has a face, it’s nearly done! Now all that’s left is assembling any last bits and making sure everything looks perfect.

Finish stuffing the ghost if needed.

Sew any final pieces (if you added extra details like accessories).

Weave in the ends to keep your ghost looking neat and tidy.

Add any extras: You can embellish your ghost with a mini witch hat, a tiny bowtie, or even hold a mini crochet pumpkin.
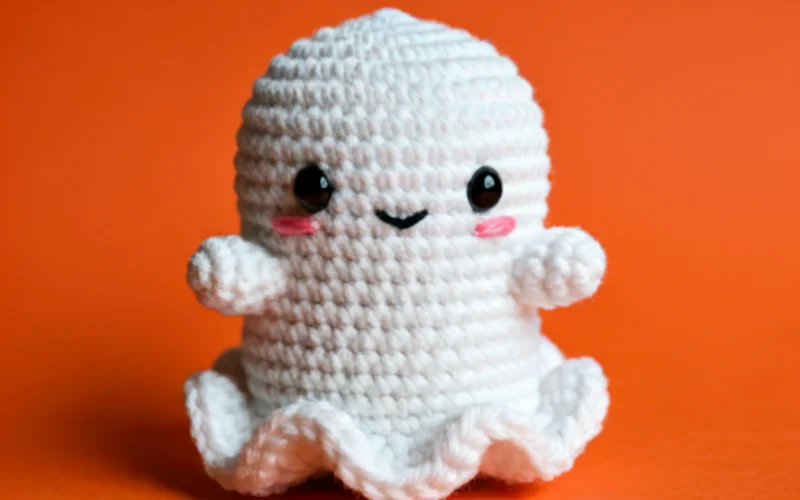
Customize Your Ghost

How to Crochet a Ghost Amigurumi

Once you’ve mastered the basic ghost pattern, the possibilities are endless! 

You can change up the yarn color to make a rainbow of ghosts, use different sizes of hooks to create a family of ghosts, or add spooky accessories like little hats or bats.

Ideas for Customizing:

Glow in the Dark Yarn: Perfect for making your ghost spooky at night!

Rainbow Ghost: Use different colors of yarn for each round to create a fun, multicolored ghost.

Ghost Family: Make ghosts of different sizes using smaller or larger hooks and yarn weights.

Your Adorable Ghost is Ready!

There you have it, your very own crochet ghost Amigurumi! 

Whether you’re using it as a Halloween decoration, a fun toy, or a cute addition to your Amigurumi collection, your ghost is sure to bring a smile (or a spook!) to anyone who sees it.

Remember, the beauty of crochet is that no two projects are ever exactly alike. 

Your ghost will have its own unique personality, so embrace the imperfections and have fun with it!

Happy crocheting, and may your ghost bring you many smiles!

Join us on Crochet Patternz Community